
While involved in the 'great craft room clean up of 2012' - I found a little packet with some balls of cotton yarn and crocheted hexagons from a forgotten project.
It was supposed to be a pin cushion - from a pattern I bought from Ravelry, can't remember the name of the pattern maker.
I had 6 hexagons finished, and I think I only needed 8, but looking at it now, I think the reason I tossed it aside was that, as I was assembling it, I realised it was going to make a pretty big pincushion.
So I did what might be expected and turned it into a doily/thingy.

Anyway, I get quite a few people asking me about joining hexagon crochet, so I took the opportunity to photograph my steps to show those that need the know-how, how to join hexagons together.
I've only very roughly given the steps for crocheting the basic hexagon here, I am concentrating mainly on the joining.
PLEASE NOTE: I am speaking in UK crochet terms. So,
For the US crochet peeps -
UK dc = US sc
UK tr = US dc
I needed one more hexagon to complete my doily.
I started with a magic loop, and the first row (which I think might have been ch3, then 1tr plus1 ch x 11, join with sl. st.)


Join in new colour.
Work 2tr clusters in each space.

Now, please don't get confused by the fact that in the next photo, the colours have changed! I realised I was using the wrong colours and had to start again.
Join in next colour, 3 tr in each space.

Join in next colour, sl. st. in space between trebles, ch 4, sl. st in next space, all the way around. Sl st. into beginning sl. st. to join.

With same colour - sl. st into ch 4 loop, 4 tr, ch 3, 4 tr (makes a corner).
In next space, 4 tr,
In next space, make another corner.
Repeat above steps around. Sl. st to join.

The joining technique will work, no matter if you're making a doily or a blanket (or whatever).
Joining the hexagons
Ok.
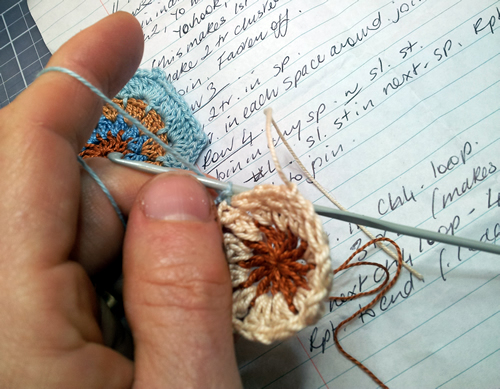
First, we need supplies.


Right.
To start with, we need to complete the next round (round 5) on one hexagon only.
See the one in the middle (picture below)?
It has 5 rows, the others still only have 4.
Round 5
This is worked the same as round 4, except instead of 1 lot of 4 tr in between corners, we have 2 lots of 4 tr in between the corners.
So, it's,
Sl. st in ch 3 space in any corner.
4 tr, ch 3, 4 tr (makes a corner).
4 tr in next space.
4 tr in next space.
4 tr, ch 3, 4 tr in next corner.
(remember we are only doing this on one block at this stage)

Now we are going to attach the adjacent block to this completed one.
Make a corner as shown below.

continue along the side.

And continue along the next side (edge of hexagon) but only complete half the next corner.
ch1, then sl. stitch into the 3 chain loop of corner on completed block.
(shown below).
ch1, then complete the half done corner with the other 4 trebles.

Now, insert hook into next space on the completed block.
Sl. stitch.

Do the next 4 treble on the block you are joining.
Continue like this down the side. (shown below)

When you come to the corner - work as for the previous corner you joined.
(Do the first 4 trebles of corner, ch.1, sl. stitch in corner loop of opposite block, ch. 1. complete the 4 treble on the corner.)

Work your way around this block to the beginning and sl. stitch to join.

Now we are going to join the block on the opposite side (with the orange outer row)

Work 1 complete edge, the work the next edge, up to the first 4 treble of the corner, ch.1, sl. st. in opposite corner, ch. 1, complete the corner with the 4 trebles.


Work up the side, do the next corner and complete the block as you did for the previous one.
Now we are joining the next row. Same way as before as you come down the first edge and do the first corner.

Now we have to join the corner into 2 opposite corners.
Do the first 4 treble. Ch. 1.
Sl. stitch into corner loop of block A.
Now sl. stitch into corner loop of block B.
Now ch. 1.
4 treble into corner of joining block to finish corner.


Continue along edge as before and next corner as before.
Complete this block.

With the next block, there are even more corners to join at.
Just complete each one as shown previously.
Look at image below to see where you are joining.


Now complete the bottom row the same way.


Congratulations.
You can use this joining method for (adapted) for joining other types of crochet blocks.

cheers
Fi
Oh Fi! This is beautiful!!! Thanks for the tutorial. It's much needed here.
ReplyDeleteHave a lovely weekend Dear,
Danette
Your welcome Danette.
Deletecheers
Fi
How timely! I just finished some hexagons and wanted a pretty, easy way to join them! Ta!
ReplyDeleteOh my pie - crochet and I are like algebra and long dvision....much as I try it doesn't compute!!! You are seriously clever! Thank you so much for your lovely comment - and yes definitely everything multiplied by 4!!
ReplyDeleteSarah -x-
Glad to see you really did multiply everything by 4 - that meal you had at the nursery was so BRILLIANT!!!
Deletecheers
Fi
Loving your hexagons your first blanket is gorgeous and so is the little doily. When i get my hands into gear i will have a go at these thnak you for sharing. dee x
ReplyDeleteThis tutorial is great. I love the join-as-you-go method for joining motifs. One question though, am I seeing right, do you join yours by coming from underneath the work? I have been taking my hook and inserting it into the top of the spot I want to pull my thread through.....maybe that is an southern hemisphere thing, lol
ReplyDelete(((HUGS))) Susanne :)
Hi Susanne,
DeleteYou know, I never really thought about whether I do that from the top or bottom! and when I deliberately try and think about it, I cant really decide which.
Just shows, that either way, doesn't really matter.
cheers
Fi
That looks so wonderful. I have never tried it, so this will be a great opportunity ; )
ReplyDeleteHave a wonderful day.
Thank you for the tutorial. When I finish all of my other WIP's maybe I'll give it a go.
ReplyDeleteCindy Bee
What a super tutorial (and your colours are so pretty. Love the blue and cream, just lined up similar colours for a blanket I've been asked to make. Seeing yours just confirms that I'd made the right decision!) Thank you for stopping by my blog - AND CONGRATULATIONS ON THE BIRTH OF YOUR GRANDDAUGHTER! :-)
ReplyDeleteHi Gingerbread Lady,
DeleteThankyou for your lovely comment.
I just should add tho', that unless you know something I don't, I havent been blessed with grandkids yet!!
One day, tho, Im waiting......
cheers
Fi
winner winner chicken dinner!!!!!!!!!
ReplyDeleteI love the look of this! Have the crochet cotton laid out and have been looking for a project like this! As soon as the 4, no wait 5 no...never mind, I might just start it today!
ReplyDeleteThanks for sharing!
Cathy
Hi, Fi!
ReplyDeleteThanks for the tutorial. Lovely colours.
Raquel*
Hello!!! I am brand new to your blog, finding my way over from the Flower Bed! I love your blog so far and I can't wait to read more!!! I also can't wait to try this, it looks pretty awesome.
ReplyDeleteHave a wonderful day
<3 Jenn
creativelycraftyjenn.blogspot.com
I just adore this! Very helpful and your staging is so pretty!
ReplyDeleteThank you for this tutorial! I just make my first three hexagons (based on this tutorial as well) and joined them. (Just to see if I could make that work).
ReplyDeleteWorked like a charm... and I'm really excited to make more...
Lindo trabalho!
ReplyDeleteHugs